8 minutes
Introduction to GitOps on Kubernetes with Flux v2
Today we’re having a look at how to set up a GitOps pipeline for your Kubernetes cluster with Flux v2.
We will first go through some core concepts of Flux and then create our first GitOps workflow.
You will need access to a Kubernetes cluster, a shell interface and a Github account to follow this guide. Note that you can use any git provider (Gitlab, Bitbucket, custom) but you’ll have to modify the provided example commands.
What is GitOps?
GitOps is a way of managing your infrastructure and applications so that whole system is described declaratively and version controlled (most likely in a Git repository), and having an automated process that ensures that the deployed environment matches the state specified in a repository.
In Kubernetes practice this means that git is used over kubectl (helm, etc) to perform operations tasks against the cluster.
Pushing to master triggers a deployment to the cluster. We can work with branches and Merge Requests to diff and
review changes to the desired cluster state. We can audit past cluster states with git log. We can rollback a change
using git revert.
What is Flux v2?
Flux v2 is a Toolkit for building GitOps workflows on Kubernetes.
In simplified terms, Flux v2 is deployed to a Kubernetes cluster and configured to watch git repositories containing Kubernetes manifests.
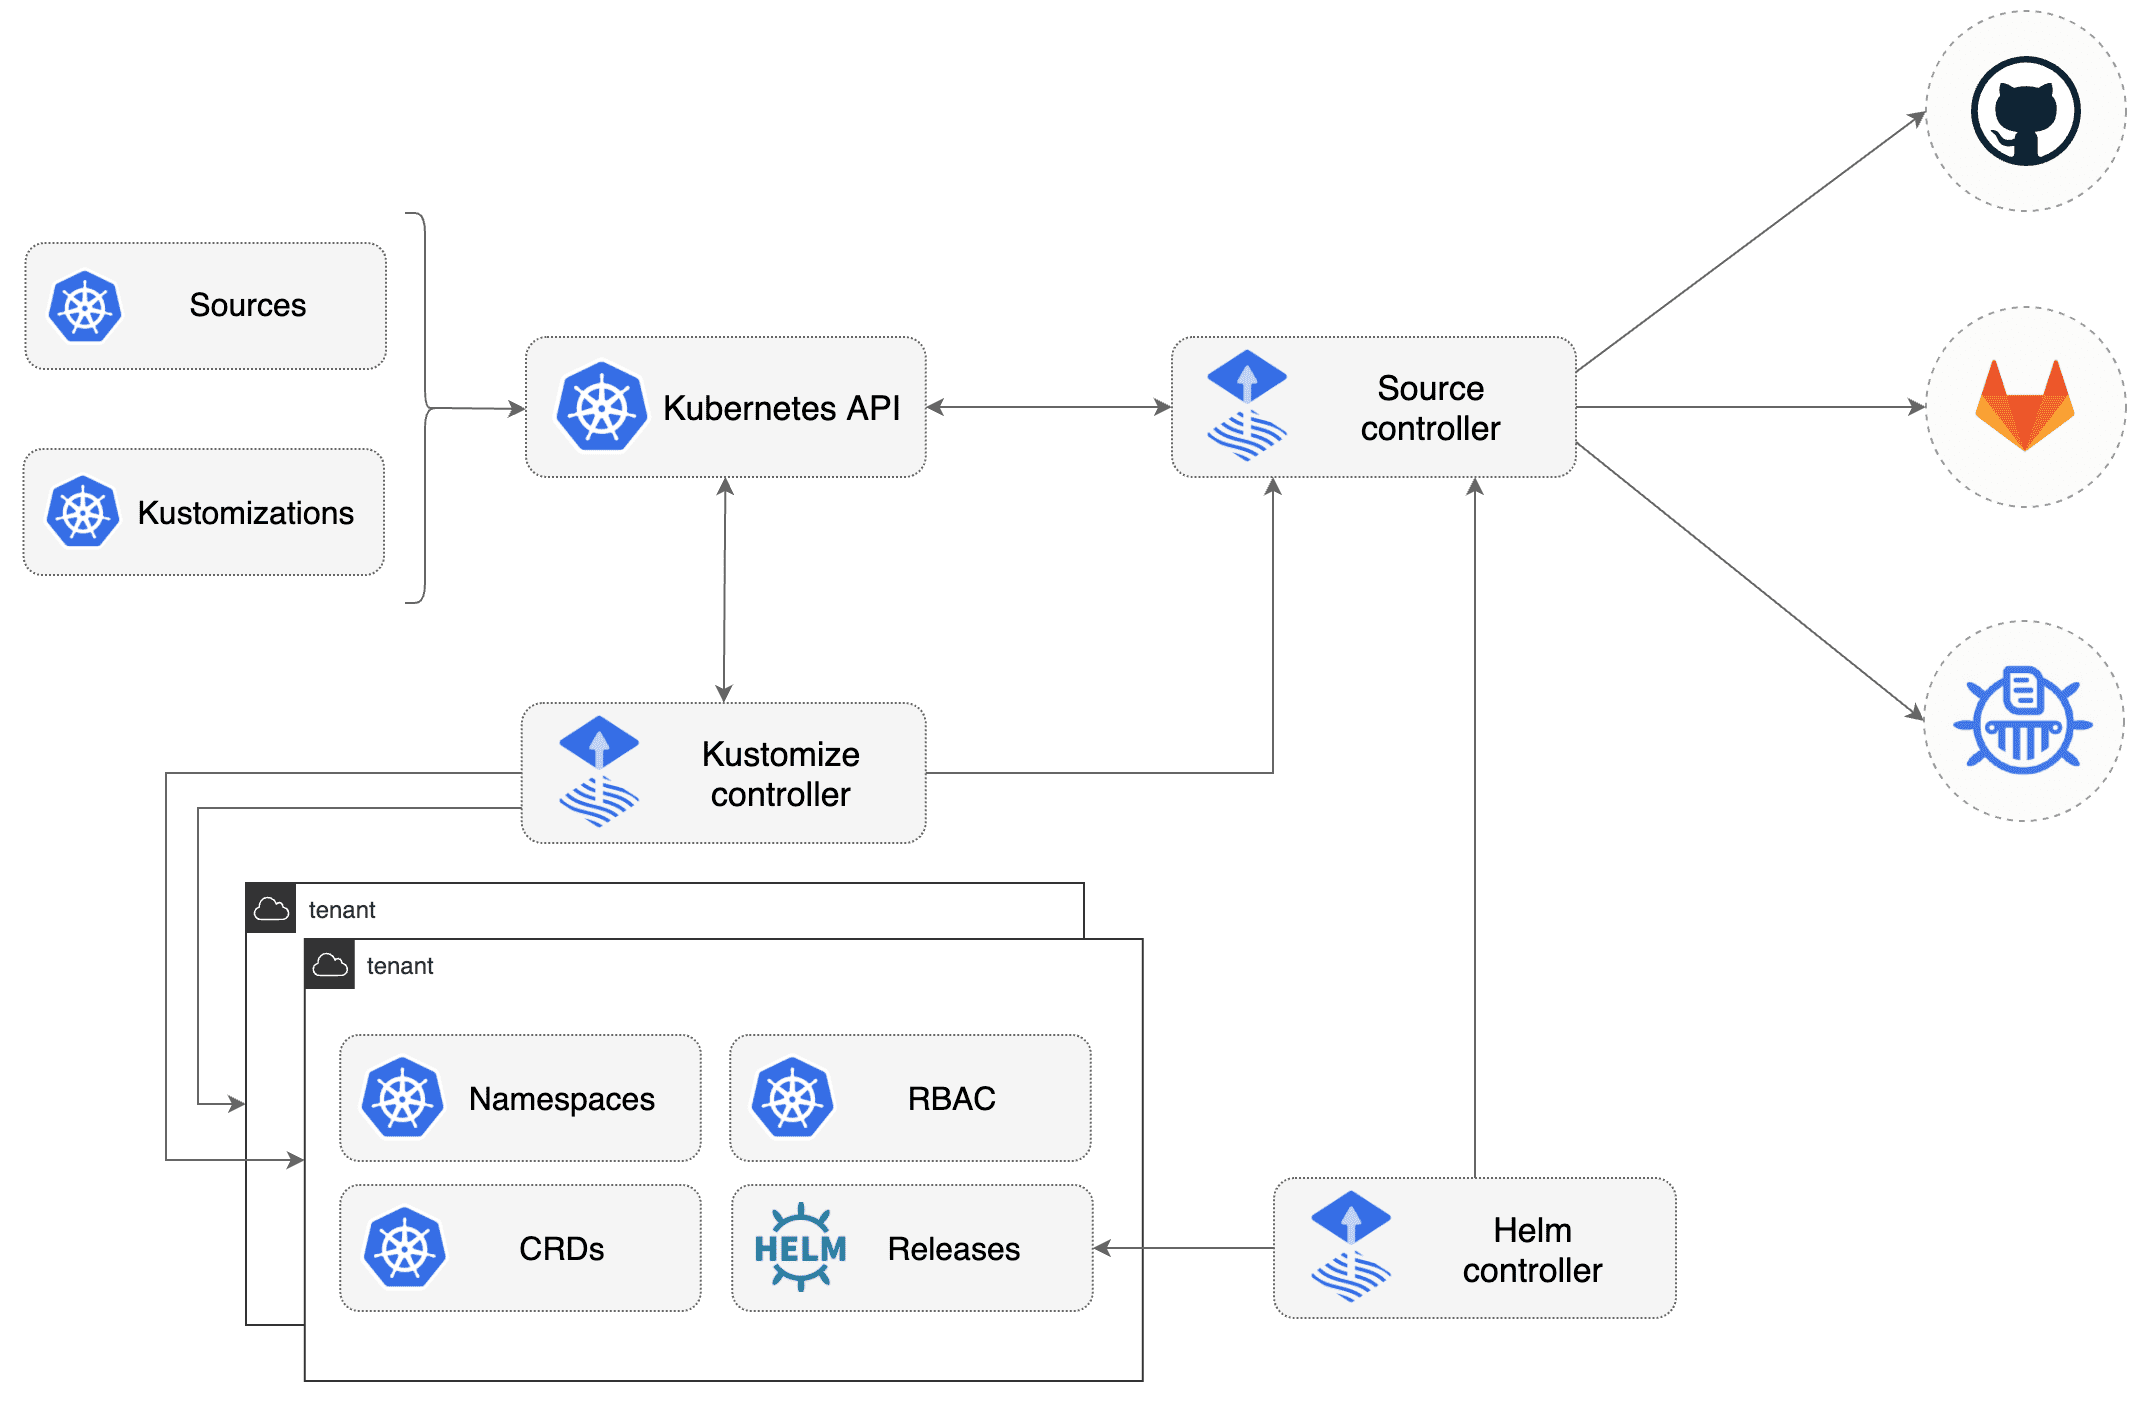
As Flux watches all our repos and pulls the changes into the cluster, we can focus on writing our Kubernetes manifests. We don’t have to worry about client-side tooling and pushing the changes from every git repo into the cluster. This is what GitOps is about.
We will come back to the individual Flux components once we’ve installed them in the upcoming steps.
Installing Flux v2
We’ll follow the official docs and use the flux CLI tool.
You can install it with:
curl -s https://toolkit.fluxcd.io/install.sh | sudo bash

# enable completions in ~/.bash_profile
. <(flux completion bash)
The flux bootstrap command will ensure that:
- A new GitOps repository for our manifests is created on Github
- A
flux-systemnamespace with all Flux components is configured on our cluster - The Flux controllers are set up to sync with our new git repository
ℹ️ Note that there’s also Terraform Provider as an alternative installation method.
The following snippet shows an annotated bootstrap command.
Feel free to play around with flux bootstrap --help to get to know all available options.
export GITHUB_TOKEN=<your-gitlab-token-here> # 1

flux bootstrap \
  github \                      # 2
  --owner <your-github-user> \  # 3
  --repository cluster-name \   # 4
  --personal \                  # 5
  --private \                   # 6
  --path cluster \              # 7
  --branch master               # 8
- We’re going to need to give
fluxaccess to our Github account so that it can manage our GitOps repository on our behalf. You can generate a new Personal Access Token in Github Settings. - We need to tell Flux that we’re using Github as git provider. You can also use Gitlab and generic git servers.
- The Github username.
- The name of our git repository.
- (Optional) We’re creating a personal Github repo.
- (Optional) We’re starting out with a private Github repo.
- (Optional) A path inside the repository to be watched by Flux.
- (Optional) The git branch to be watched by Flux.
The bootstrap command is interactive and will let you know about the progress and state of the installation.
This is all you need to get up and running with Flux. Note that the boostrap command is idempotent and can also be used with an existing GitOps repository.
Inspecting the Flux components 🕵
The flux-system namespace
Let’s take a look at what was deployed to the k8s cluster for us.
# Let's have a look at the Flux controllers...
kubectl get pods -n flux-system
out:NAME                                      READY   STATUS    RESTARTS   AGE
out:helm-controller-c858b9c65-v8pgr           1/1     Running   28         17d
out:kustomize-controller-6767b8fd78-8ptd4     1/1     Running   30         17d
out:notification-controller-db467b4fb-pt9tc   1/1     Running   29         17d
out:source-controller-7b4d748b45-2blvd        1/1     Running   28         17d
# And the custom resource definitions...
kubectl get crd -o name | grep flux
out:customresourcedefinition.apiextensions.k8s.io/alerts.notification.toolkit.fluxcd.io
out:customresourcedefinition.apiextensions.k8s.io/buckets.source.toolkit.fluxcd.io
out:customresourcedefinition.apiextensions.k8s.io/gitrepositories.source.toolkit.fluxcd.io
out:customresourcedefinition.apiextensions.k8s.io/helmcharts.source.toolkit.fluxcd.io
out:customresourcedefinition.apiextensions.k8s.io/helmreleases.helm.toolkit.fluxcd.io
out:customresourcedefinition.apiextensions.k8s.io/helmrepositories.source.toolkit.fluxcd.io
out:customresourcedefinition.apiextensions.k8s.io/kustomizations.kustomize.toolkit.fluxcd.io
out:customresourcedefinition.apiextensions.k8s.io/providers.notification.toolkit.fluxcd.io
out:customresourcedefinition.apiextensions.k8s.io/receivers.notification.toolkit.fluxcd.io
Great! The Flux controllers are running and we have a bunch of new CustomResourceDefinitions available to us. Read ahead to learn more about how those play together.
The GitOps repository
To better understand how Flux works, let’s now take a look at the directory structure of our bootstrapped GitOps repository on Github. We’re going to see that the bootstrap command has created some Kubernetes yamls for us.
git clone git@github.com:${username}/cluster-name.git
cd cluster-name
tree
out:.
out:├── cluster
out:│   └── flux-system
out:│       ├── gotk-components.yaml
out:│       ├── gotk-sync.yaml
out:│       └── kustomization.yaml
out:└── README.md
out:
out:2 directories, 4 files
Cool. We’ll go through the individual files.
The cluster directory
This directory was created because we used flux bootstrap ... --path cluster ... during bootstrapping.
We’ll see in a second that this folder is also special because it’s being watched by the Flux kustomization-controller.
Any Kubernetes yaml that we throw in this directory will be deployed to our cluster. It also means that we can have
different files and directories in our repository that will never make it to the cluster. This is useful because we could
have one single git repository for our infrastructure declarations and divide it into sub-paths for different k8s clusters
or environments. For example, we could bootstrap multiple Flux environments and use paths like
dev-cluster, stage-cluster, prod-cluster.
That’s just one way to organize. It’s nice that we have this flexibility.
The flux-system directory
This directory represents the flux-system k8s namespace and contains Kubernetes declarations.
I like to continue this pattern and create a subdirectory for each namespace that I deploy with Flux.
Example:
└── cluster
    ├── flux-system
    ├── monitoring
    ├── cool-app-namespace
    └── monitoring
This isn’t required. You’re flexible and can structure the /cluster directory like you want!
kustomization.yaml
As we can see Flux created a simple kustomization.yaml for us. If you’re not familiar with Kustomize
you can just ignore this for now. All it does is include the other two files in the cluster/flux-system directory.
# cluster/flux-system/kustomization.yaml
apiVersion: kustomize.config.k8s.io/v1beta1
kind: Kustomization
resources:
- gotk-components.yaml
- gotk-sync.yaml
gotk-components.yaml
This file contains the GitOps ToolKit components 🤯 -
in here you will find the Deployments and Services for the Flux controllers and all the CustomResourceDefinitions
that we’ve already seen when we inspected the flux-system namespace.
This file is generated by the flux bootstrap command and you shouldn’t have to deal with it manually.
gotk-sync.yaml
The file gotk-sync.yaml is more interesting to us. This file declares our first two custom resources for Flux.
# cluster/flux-system/gotk-sync.yaml
---
apiVersion: source.toolkit.fluxcd.io/v1beta1
kind: GitRepository
metadata:
  name: flux-system
  namespace: flux-system
spec:
  interval: 1m0s
  ref:
    branch: master
  secretRef:
    name: flux-system
  url: ssh://git@github.com/your-user-name-here/cluster-name
---
apiVersion: kustomize.toolkit.fluxcd.io/v1beta1
kind: Kustomization
metadata:
  name: flux-system
  namespace: flux-system
spec:
  interval: 10m0s
  path: ./cluster
  prune: true
  sourceRef:
    kind: GitRepository
    name: flux-system
  validation: client
Let’s take a closer look at these two…
The flux-system GitRepository
The first custom resource is of type GitRepository. A GitRepository is one of the possible Sources that are picked
up by the Flux source-controller.
Once a repository is registered with this controller, the Flux toolkit is able to watch it for changes
and notify other Flux controllers to apply the contents to the cluster.
This specific GitRepository definition tells Flux to check the master branch of our new GitOps repository
from Github. every 1m0s using a flux-system secret for authentication
(this secret contains your Github Personal Access Token that we created during bootstrapping).
Note that we could create more GitRepository resources and effectively sync any number of GitOps repositories with our Flux-enabled cluster.
Example use-case: You have multiple teams that want to deploy to one cluster. You want each team to maintain their own infrastructure repository. You could set up Flux on the cluster such that it pulls each team’s repository.
Read more in the Flux Docs.
The flux-system Kustomization
The second custom resource in this file is a (Flux-) Kustomization.
⚠️ Not to be confused with a Kustomize resource.
A Flux Kustomization describes a path inside of a Source that Flux should apply to the cluster. It’s assumed that there are Kubernetes yamls and/or Kustomize yamls located in the directory at the named path.
The Flux kustomize-controller is going to periodically apply the yamls at the given location to our cluster.
Here’s a simplified walk-through of how the kustomize-controller is going to install our k8s resources.
- Checkout the configured branch from
ssh://git@github.com/${username}/cluster-name - Change the working directory to the specified path:
./cluster - Build a root
Kustomizeyaml at this location if no explicit one is available:kustomize create --autodetect --recursive > kustomization.yaml - Apply the result:
kubectl apply -k kustomization.yaml`
I think it’s good to know how kustomize is being used to build the final Kubernetes manifest from our GitOps repo.
The commands above can be used for testing locally. This is especially helpful when you mix plain Kubernetes yamls with
Kustomize yamls as this has an impact on the recursive auto-detection.
Deploying own resources
Let’s do a really simple example on how to deploy stuff to our cluster.
All we want to do is create a new namespace “awesome-namespace”.
# Create a new directory for our namespace
mkdir cluster/awesome-namespace

# Create the Kubernetes namespace descriptor
cat <<EOF > cluster/awesome-namespace/namespace.yaml
out:---
out:apiVersion: v1
out:kind: Namespace
out:metadata:
out:  name: awesome-namespace
out:EOF

# Commit and push the change
git add .
git commit -m "Add 'awesome-namespace'"
git push
Lean back and watch as the new namespace is shipped to our cluster 🛳️
Summary
We installed the Flux GitOps toolkit to a Kubernetes cluster and deployed a Kubernetes manifest by only using git.
Along the way we learnt about the Flux components.
I hope this gave you an introduction on what Flux v2 is, how it works and how you can use it to enhance your CI/CD workflows.
I’m planning to write more about this topic in the future. We’ll take a look at how to integrate SOPS for secret handling, how to deploy Helm Charts and how to set up Flux notifications.
If you read this far, hit me up in the comments, on Twitter or Instagram to let me know how I did.
Thanks 🙏
fluxcd gitops kubernetes devops kustomize
1680 Words
2021-02-19 00:00 +0000 (Last updated: 2021-02-23 22:07 +0000)
a96cee7 @ 2021-02-23